
SQL Delta Help
Schema Compare Tips
Auto Select a Small Set of Tables for Scripting
The Filters provide a convenient way to initially de-check objects and then check a selection of objects ready for scripting. Combine this with the Persist option and every time you run the project a consistent selection of objects is shown.
Run the schema compare and when the tab is shown click Apply Filters.
First choose De-Check All Objects in Pre-Filter Select Action, this action ensures all objects are unchecked. Then choose Check All Objects in the Select-Filter Action. Click Persist Filters to keep this filter active whenever the project runs.
Now enter the filter to apply, for example clear all the check boxes from Display Checked Objects (this filters out object types) and then check Views. Now only views will be displayed and ready for scripting.
Click away from the Filter box or press F4 and the filter will be applied.
How can I limit the load to Tables and Views
When editing the project click the Map and Filter tab. At the bottom there are the load filters, check the Load Filter Active.
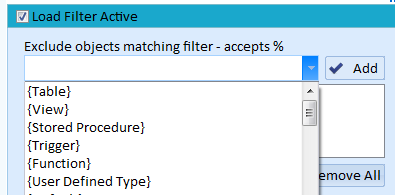
Add (one at a time) each object from {Stored Procedure} down to the filter and now only tables and views are loaded. You may wish to leave {Triggers} since these are generally part of the table structure.
The Script Shows Objects I didn't Check.
Click No Depend in the Compare Result tab and this will stop SQL Delta automatically adding dependent objects. See Dependency
Change the Column Sort
Ctrl+Click the column to sort in schema compare results. You can also click the Display button and configure a sort and even save the sort by checking Save Sort Order.